Rabu, 31 Agustus 2011
Senin, 29 Agustus 2011
mengizinkan-akses-internet-berdasarkan-mac-dan-tujuan-website-tertentu
Tutorial ini dibuat atas permintaan client yang menggunakan mikrotik dengan sistem bridge tetapi ingin melakukan blok akses terhadap situs dan mac tertentu. Dalam konfigurasi ini saya menggunakan bridge firewall (use IP firewall).
Topologinya sebagai berikut :

- Blok akses internet kecuali tujuan google dan yahoo.
- Akses tersebut hanya boleh di lakukan oleh MAC yang terdaftar
- Selain MAC yang terdaftar tidak di izinkan mengakses internet sama sekali.
- Mikrotik sebagai bridge (bukan route)
Bagi anda yang kebetulan mempunyai kasus yang sama, bisa ikuti langkah-langkahnya sebagai berikut.
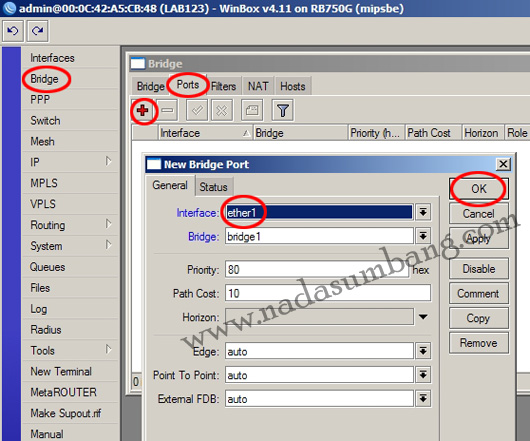
Bridge
Langkah pertama adalah membuat bridge, port yang kita bridge adalah ether1 dan ether2.


Address List
Selanjutnya kita masukan IP-IP dari situs tujuan yang akan dizinkan untuk diakses, dalam contoh ini adalah situs google.com, google,co.id, yahoo.com, dan yahoo.co.id. Ip tersebut saya daftarkan di address list dengan nama izinkan.
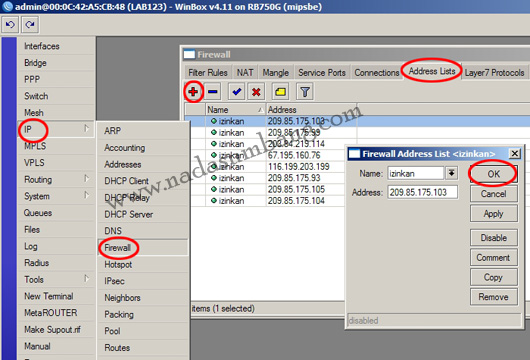
Google.com : 209.85.175.103
Google.co.id : 209.85.175.99
Yahoo.com : 67.195.160.76
Yahoo.co.id : 203.84.219.114
MAC Address
Selanjutnya kita data MAC address dari tiap-tiap PC yang akan diberi akses ke internet (Yahoo dan Google)
Firewall Filter
Setelah address list kita buat, selanjutnya kita tinggal buat rule di firewall filter.
Rule pertama yaitu mengizinkan akses website yang terdaftar di address list oleh komputer berdasarkan MAC yang dimasukan di rule.
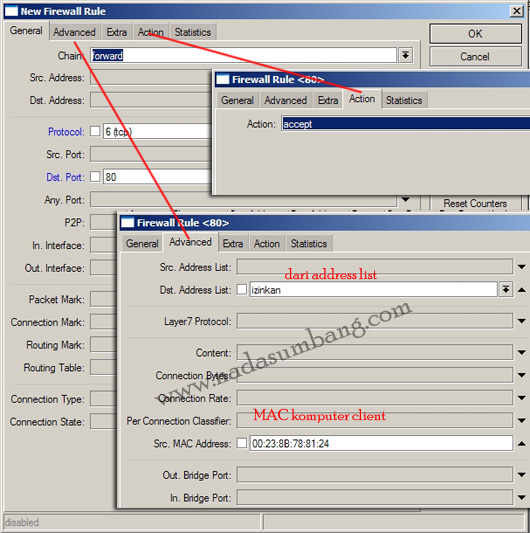
Selain tujuan yang tercantum di address list dan MAC yang terdaftar di filter rule maka koneksi akan di drop.

Kesimpulan
Setelah semua konfigurasi selesai, selanjutnya lakukan test dari komputer yang MAC nya telah di masukan di filter rule dan komputer yang MAC nya tidak di masukan.
Dari komputer yang MAC addressnya dimasukan di filter rule :
-bisa akses google
-bisa akses yahoo
-tidak bisa akses situs yang lain selain kedua situs tersebut
Dari komputer yang MAC addressnya tidak dimasukan di filter rule :
-Tidak bisa mengakses situs apapun
Topologinya sebagai berikut :
- Blok akses internet kecuali tujuan google dan yahoo.
- Akses tersebut hanya boleh di lakukan oleh MAC yang terdaftar
- Selain MAC yang terdaftar tidak di izinkan mengakses internet sama sekali.
- Mikrotik sebagai bridge (bukan route)
Bagi anda yang kebetulan mempunyai kasus yang sama, bisa ikuti langkah-langkahnya sebagai berikut.
Bridge
Langkah pertama adalah membuat bridge, port yang kita bridge adalah ether1 dan ether2.
Address List
Selanjutnya kita masukan IP-IP dari situs tujuan yang akan dizinkan untuk diakses, dalam contoh ini adalah situs google.com, google,co.id, yahoo.com, dan yahoo.co.id. Ip tersebut saya daftarkan di address list dengan nama izinkan.
Google.com : 209.85.175.103
Google.co.id : 209.85.175.99
Yahoo.com : 67.195.160.76
Yahoo.co.id : 203.84.219.114
MAC Address
Selanjutnya kita data MAC address dari tiap-tiap PC yang akan diberi akses ke internet (Yahoo dan Google)
Firewall Filter
Setelah address list kita buat, selanjutnya kita tinggal buat rule di firewall filter.
Rule pertama yaitu mengizinkan akses website yang terdaftar di address list oleh komputer berdasarkan MAC yang dimasukan di rule.
Selain tujuan yang tercantum di address list dan MAC yang terdaftar di filter rule maka koneksi akan di drop.
Kesimpulan
Setelah semua konfigurasi selesai, selanjutnya lakukan test dari komputer yang MAC nya telah di masukan di filter rule dan komputer yang MAC nya tidak di masukan.
Dari komputer yang MAC addressnya dimasukan di filter rule :
-bisa akses google
-bisa akses yahoo
-tidak bisa akses situs yang lain selain kedua situs tersebut
Dari komputer yang MAC addressnya tidak dimasukan di filter rule :
-Tidak bisa mengakses situs apapun
Minggu, 28 Agustus 2011
Jumat, 26 Agustus 2011
Kamis, 18 Agustus 2011
change_mac_w2k
--------------------
Credit:
Kyle Lai, CISSP, CISA
KLC Consulting, Inc.
www.klcconsulting.net
Artical URL: HYPERLINK "http://www.klcconsulting.net/change_mac_w2k.htm"
--------------------
Changing the MAC address in W2K and XP
(this page stolen from http://www.klcconsulting.net/change_mac_w2k.htm because I wanted a copy in my notes here so I wouldn't lose it)
Method 1:
This is depending on the type of Network Interface Card (NIC) you have. If you have a card that doesn’t support Clone MAC address, then you have to go to second method.
- Go to Start->Settings->Control Panel and double click on Network and Dial-up Connections.
- Right click on the NIC you want to change the MAC address and click on properties.
- Under “General” tab, click on the “Configure” button
- Click on “Advanced” tab
- Under “Property section”, you should see an item called “Network Address” or "Locally Administered Address", click on it.
- On the right side, under “Value”, type in the New MAC address you want to assign to your NIC. Usually this value is entered without the “-“ between the MAC address numbers.
- Goto command prompt and type in “ipconfig /all” or “net config rdr” to verify the changes. If the changes are not materialized, then use the second method.
- If successful, reboot your systems.
Method 2:
This method requires some knowledge on the Windows Registry. If you are not familiar with Windows Registry, just use the SMAC tool to change the MAC addresses, or consult with a technical person before you attempt on the following steps. Also, make sure you have a good backup of your registry.
a. Goto command prompt and type “ipconfig /all”, and
I. Record the Description for the NIC you want to change.
II. Record the Physical Address for the NIC you want to change. Physical Address is the MAC Address

figure 1.
figure 1.
b. Goto command prompt and type “net config rdr”, and you should see something like

figure 2.
c. Remember the number between the long number (GUID) inside the { }. For example, in the above “net config rdr” output, for MAC address “00C095ECB793,” you should remember {1C9324AD-ADB7-4920-B02D-AB281838637A}. You can copy and paste it to the Notepad, that’s probably the easiest way. (See figure 2.)
d. Go to Start -> Run, type “regedt32” to start registry editor. Do not use “Regedit.”
e. Do a BACKUP of your registry in case you screw up the following steps. To do this
I. Click on “HKEY_LOCAL_MACHINE on Local Machine” sub-window
II. Click on the root key “HKEY_LOCAL_MACHINE”.
III. Click on the drop-down menu “Registry -> Save Subtree As” and save the backup registry in to a file. Keep this file in a safe place.
f. Go to “HKEY_LOCAL_MACHINE\SYSTEM\CurrentControlSet\Control\Class\{4D36E972-E325-11CE-BFC1-08002BE10318}. Double click on it to expand the tree. The subkeys are 4-digit numbers, which represent particular network adapters. You should see it starts with 0000, then 0001, 0002, 0003 and so on. (See figure 3.)

Figure 3.
g. Go through each subkey that starts with 0000. Click on 0000, check DriverDesc keyword on the right to see if that's the NIC you want to change the MAC address. The DriveDesc should match the Description you recorded from step (a.-I.). If you are not 100% sure about the DriverDesc, then you can verify by checking if the NetCfgInstanceID keyword value matches the GUID from step (c).
If there is no match, then move on to 0001, 0002, 0003, and so on, until you find the one you want. Usually 0000 contains the first NIC you installed on the computer.
In this demonstration, 0000 is the NIC I selected. (See figure 3.)
If there is no match, then move on to 0001, 0002, 0003, and so on, until you find the one you want. Usually 0000 contains the first NIC you installed on the computer.
In this demonstration, 0000 is the NIC I selected. (See figure 3.)
h. Once you selected the subkey (i.e. 0000), check if there is a keyword "NetworkAddress" exist in the right side of the window. (See figure 3.)
I. If "NetworkAddress" keyword does not exist, then create this new keyword:
i. Click on the drop down menu “Edit -> Add Value”.
ii. In the Add Value window, enter the following value then click OK. (See figure 4.)
Value Name: = NetworkAddress
Data Type: = REG_SZ
Value Name: = NetworkAddress
Data Type: = REG_SZ
Rabu, 17 Agustus 2011
OS Win 7 Limited Or No Connection Pada Mikrotik
Memperbaiki Wireles Yang Tidak Connect Ke Internet
Wireles sekarang sudah bannyak di sekitar kita, apalagi untuk internet... uh... berserakan "hotspot area"
Teman saya mau online menggunakan laptopnya. begitu mau connecting ke internet jupa masalah"Limited or No Connectivity".
biasanya masalah yang muncul pada wireles adalah seperti:
"Validating Identity" atau
"Limited or No Connectivity"
dll
Jangan Bingung... kalau jumpa masalah seperti diatas
coba aja reset ipnya dengan cara....
untuk windows:
- Klik menu "START"
- Pilih "RUN"
- pada menu run ketikan kode "CMD" tanpa tanda kutip yah... lalu klik "OK"
di windows akan muncul aplikasi cmd- pada kotak cmd tersebut ketikkan perintah di bawah ini:
netsh int ip reset resetlog.txt ("Enter" pada keyboard)
netsh winsock reset catalog ("Enter" pada keyboard lagi)
- Close dengan menekan tombol "X" di menu atau mengetikan "exit" enter pada cmd tsb.
- Restart komputer anda dan coba connect ke internet
Biasanya wireles akan connect internet.... semoga bermanfaat... ^_^
OS Win 7 Susah Dapat DHCP Di Mikrotik
Terjadi pada kasus Hotspot dimana Wifi Laptop yg memakai Win7 ngga bisa konek ke AP
Trik nya sebagai berikut:
Trik ke 1.
masukin ip address (manual ip)
karna lebih cepat connect jika di beri IP statis di banding yang auto…..
jangan lupa cek juga gatewaynya karena setelah kita save gateway bisa kosong lagi. jadi harus di isi lagi
cuma rada ribet isi manual, tiap ada user tampang baru, musti isi ip manual lg..
tp anehnya ngk smua win7 kayak gitu.
Trik ke 2.
coba diturunin kecepatan duplex dari lancard clientnya jadi 10Mbps full duplex (koneksi LAN)
Trik ke 3.
Network policy dari vista ato 7 emang gitu. Untuk unsecured wifi (tanpa encryption) akan sulit di allowed ma windows, triknya adalah menambahkan Wireless Connection profile secara manual (bukan IP) tapi masukin SSID secara manual di “manage wireless network” jangan lupa pilih “automatically conneting”
Selain hal diatas network location juga harus di set ke HOME/PRIVATE jangan PUBLIC biar semua acces di allowed ma Windows.
Trik ke 4.
win 7 suka ada default route 0.0.0.0
nah kalo ada itu penyakit ngga bakalan bisa konek internet, caranya ;
search -> cmd -> klikkanan -> run by administrator -> router DELETE 0.0.0.0 , kemudian coba ping
Jika ada yg ingin menambahkan silahkan komen
Sumber dari sini
Langganan:
Postingan (Atom)